· 19 min read
Deploying a Fullstack Website
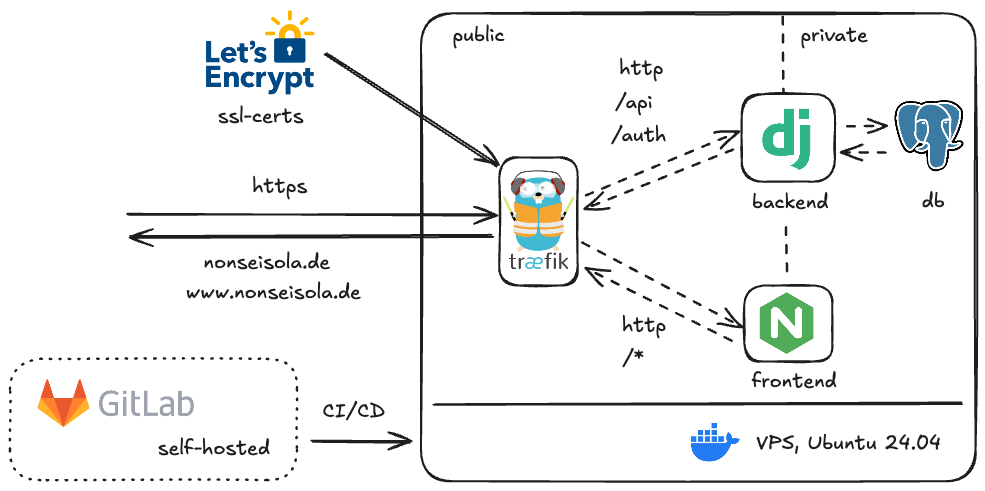
Guide on deploying a full-stack Django and Vite+React app on a VPS with Docker, Traefik, PostgreSQL, and security best practices.
For my lastest project I collaborated with the nonprofit ReteDonne e.V. We build a website for italian women living in Germany who were victims domestic violence and want to find help in their vicinity by using our interactive map.
Since we were planning to constantly update and improve the offered information, we choose to use a backend that handles the content and offers the ability to collaborate. The site contains a restricted area where editors can add, remove or alter the information shown in the map and reflecting the updated content immediately in the map.
Here is a breakdown of the technologies I used for deploying this fullstack project on a VPS.
VPS
I wanted to be able to control the environment of the deployed applications without beeing dependent on Google, Amazon or Microsoft. The decision fell on a VPS from Hostinger (after beeing bombarded of sponsored ads on YouTube by most of the Tech Influencers). If you want to deploy your application on Hostingers infrastructure, be sure to use my referral link on Hostinger.
As an os my goto choice is Ubuntu lts with docker for deploying the applications, since I use the same environment on my homelab running proxmox and several vms.
Securing your VPS - Firewall
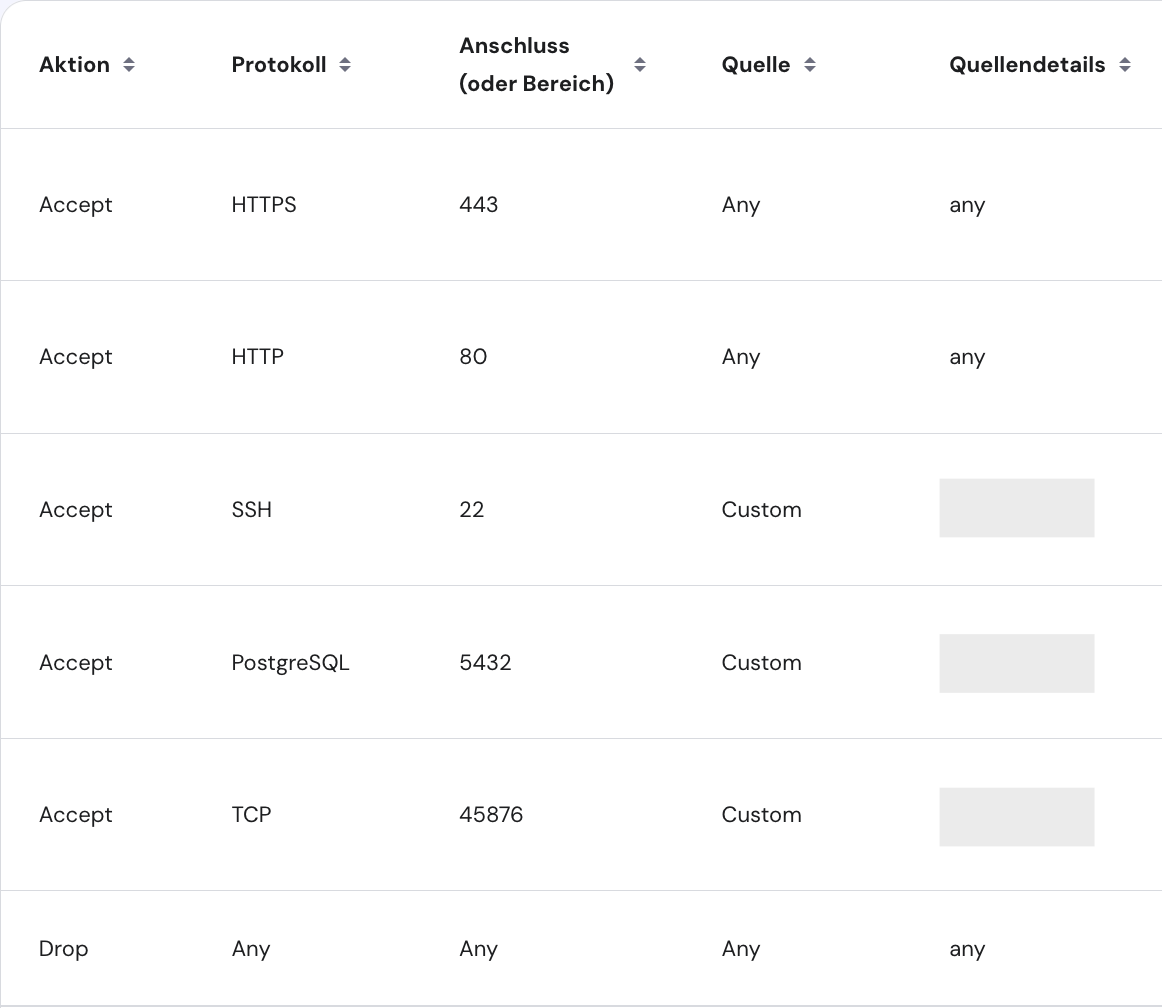
The most straight forward way in securing your VPS is using a firewall to block unwanted traffic to unused ports. Hostinger offers a Application Firewall inside their management panel, but the same result can be reached by using ufw on Ubuntu. By default the Firewall blocks all incoming traffic.
For the services there is only one main protocol we need to use: HTTPS and HTTP. The other protocols are used for managing the VPS: SSH, Postgres and Monitoring. If you have a static IP-Address you can configure the access only to your IP, mitigating an additional attack vector. Nevertheless strong passwords for ssh and database access are key components for enhancing security.
Securing your VPS - SSH
Hostinger lets you define a root-user access and gives you the option to upload an ssh key. Since the root-user can change everything on the system, we want to limit its capabilities by not allowing password login. In the rare occurance that the strong password you choose (hopefully) gets cracked or leaked, the attacker can’t access the machine via ssh.
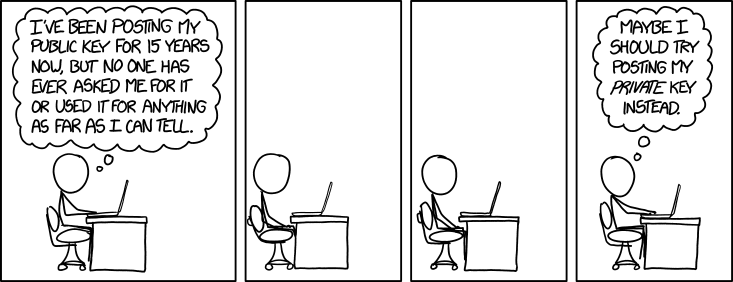
Unlike in the comic, don’t EVER post your private ssh key. On the server side we deposited our PUBLIC key in the ~/.ssh/authorized_keys file.
Disable password login
Once loged in as root, we are going to edit the sshd_config file:
nano /etc/ssh/sshd_configEdit this line PermitRootLogin yes to PermitRootLogin no. Now we have to restart the sshd service. On Hostingers instance the service is called ssh:
systemctl restart sshThis is the most critical moment. If you messed to much with the config file, you can end up locking out yourself and not beeing able to log back in. In that case it is possible to use the web-termnial (if present) or you have to contact your VPS provider.
Creating a new user
For the same reason as before, we want a user that can’t fully change the system. Let’s create a new user:
adduser usernameGrant him sudo privileges
usermod -aG sudo usernameTest the newly created user by loggin in as him
su - usernameand paste a new ssh key to the folder ~/.ssh/authorized_keys.
Setting up
Now we are at the point of installing the required dependencies. Before that we update our packages:
sudo apt update && sudo apt upgrade -y && sudo apt autoremoveNext install docker (this script can be outdated by the time of reading. Consult the documentation for updated instructions)
# Add Docker's official GPG key:
sudo apt-get update
sudo apt-get install ca-certificates curl
sudo install -m 0755 -d /etc/apt/keyrings
sudo curl -fsSL https://download.docker.com/linux/ubuntu/gpg -o /etc/apt/keyrings/docker.asc
sudo chmod a+r /etc/apt/keyrings/docker.asc

# Add the repository to Apt sources:
echo \
  "deb [arch=$(dpkg --print-architecture) signed-by=/etc/apt/keyrings/docker.asc] https://download.docker.com/linux/ubuntu \
  $(. /etc/os-release && echo "${UBUNTU_CODENAME:-$VERSION_CODENAME}") stable" | \
  sudo tee /etc/apt/sources.list.d/docker.list > /dev/null
sudo apt-get update
sudo apt install docker-ce docker-ce-cli containerd.io docker-buildx-plugin docker-compose-pluginDone! Thats all we need on the server-side.
Domain and DNS
If you want to use a custom domain you need to point it to your new server. Therefore copy the IP-Address (v4 and v6) and head to your provider of choise (mine is Strato since they offer cheap tld domains for the german tld .de).
Configure the A and AAAA records accordingly, by pasting the IP-Addresses in the records. The instructions vary from provider to provider.
For SEO reasons I would recommend creating the subdomain www and pointing it at the same addresses. I choose to use root domain for the website and to redirect www traffic to it. This will be configured later in the settings of the reverse proxy.
If you expect increased usage of your site, maybe consider cloudflares offerings for ddos and bot protection. In my case I didn’t want to mess to much with DNS settings but I used cloudflares Turnstile at a later point in my application for spam protection of the contact form.

Like in the annoying italian talkshow / panel discussion Non mettetevi troppo comodi (eng.: Don’t get too comfortable), we are just getting started. Let’s look at the application side of the project.
Fullstack dockerized application
As a backend I choosed Django for its easy to use ORM and model declaration features. Whereas for the frontend I went for Vite+React for reusability and responsiveness. Both are dockerized and configured for production use.
Traffic from and to the services is managed by the reverse proxy traefik. It handles HTTPS encryption of the incoming and outgoing connections by issuing free ssl-certificates. If you have the money and dedication, you can buy a ssl-certificate. You just have to remember to pay and update the certificates once they expire.
Another benefit is that you can close the HTTP port to your server, since traefik communicates with Let’s Encrypt via port 80.
Django Backend
Follow any tutorial on getting started with Django and configure your apps inside of django. Here we will take a look at hardening the instance and setting up development and production environments.
This my project structure:
.
├── 🗂️ .venv
├── 🗂️ api
│   ├── __init__.py
│   ├── adapter.py
│   ├── admin.py
│   ├── apps.py
│   ├── 🗂️ migrations
│   ├── models.py
│   ├── serializers.py
│   ├── service.py
│   ├── tests.py
│   ├── urls.py
│   └── views.py
├── 🗂️ app
│   ├── __init__.py
│   ├── 🗂️ settings
│   │   ├── base.py
│   │   ├── deployment.py
│   │   └── development.py
│   ├── urls.py
│   └── wsgi.py
│   ├── asgi.py
├── entrypoint.dev.sh
├── entrypoint.prod.sh
├── Dockerfile
├── Dockerfile.prod
├── manage.py
├── requirements.txt
└── static
Virtual environment
First thing to assure that your application will run anywhere you deploy it, is to create an virtual environment.
python3 -m venv .venvOn linux/mac activate the new environment with:
source .venv/bin/activateEnvironment Variables
Since saving secret values in plain text in the source code can cause unwanted harm we want to use env-variables. My preferred way to use them is by utilizing the package python-dotenv.
Simply install it in the newly created virtual environment with pip
pip install python-dotenvand load the env variables inside the python files with
from dotenv import load_dotenv

load_dotenv()
Now you can use os.getenv("DB_NAME") to load env-variables in your code.
Settings
The default configuration of django ships with a single settings.py file. Why would we want to change that? When later working with authentication, csrf protection and other security settings we want to be able to have a less stringent environment while developing new features.
Start by creating a new folder settings inside your django project (in my case its app).
├── 🗂️ app
│   ├── __init__.py
│   ├── 🗂️ settings
│   │   ├── base.py
│   │   ├── deployment.py
│   │   └── development.py
│   ├── urls.py
│   └── wsgi.py
│   ├── asgi.py
Now create three files: base.py, development.py, deployment.py. The first one will contain the default settings that apply to both environments like INSTALLED_APPS. In the latter ones you import the base configuration and add additional settings accordingly. Ex.: development.py
from .base import *

DEBUG=False
We still need a way to let the program know wich file to use. This gets handled by an environment variable called DJANGO_SETTINGS_MODULE. Now we adapt a few files to load the correct settings (changes highlighted with ->):
wsgi.py
import os
from django.core.wsgi import get_wsgi_application
-> from dotenv import load_dotenv

-> load_dotenv()

-> os.environ.setdefault("DJANGO_SETTINGS_MODULE", "app.settings")

application = get_wsgi_application()
asgi.py
import os
from django.core.asgi import get_asgi_application
-> from dotenv import load_dotenv

-> load_dotenv()

-> os.environ.setdefault("DJANGO_SETTINGS_MODULE", "app.settings")

application = get_asgi_application()
manage.py
import os
import sys
-> from dotenv import load_dotenv


def main():
    -> load_dotenv()

    -> os.environ.setdefault("DJANGO_SETTINGS_MODULE", "app.settings")

    try:
        from django.core.management import execute_from_command_line
    except ImportError as exc:
        raise ImportError(
        "Couldn't import Django. Are you sure it's installed and "
        "available on your PYTHONPATH environment variable? Did you "
        "forget to activate a virtual environment?"
        ) from exc

    execute_from_command_line(sys.argv)

if __name__ == "__main__":
    main()
Database
Here you can use the split up settings file to define a sqlite database for development and a postgres database for production. I like to use the same resources to be sure that everything works as expected.
DATABASES = {
    "default": {
        "ENGINE": "django.db.backends.postgresql_psycopg2",
        "NAME": getenv("DB_NAME"),
        "USER": getenv("DB_USER"),
        "PASSWORD": getenv("DB_PASSWORD"),
        "HOST": getenv("DB_HOST"),
        "PORT": getenv("DB_PORT"),
    }
}
CORS & CSRF
Working with possible different domains that access the backend we have to configure Cross-Origin Ressource Sharing. During development these settings get ignored by django and you can allow any traffic. Going into production it is critical to limit access:
from corsheaders.defaults import default_methods
from corsheaders.defaults import default_headers


CORS_ALLOW_METHODS = [
    *default_methods,
    "DELETE",
    "GET",
    "OPTIONS",
    "PATCH",
    "POST",
    "PUT",
    "VIEW",
    "HEAD",
]

CORS_ALLOW_HEADERS = [*default_headers, "Credentials", "Content-Disposition"]

CORS_EXPOSE_HEADERS = [
    "Access-Control-Allow-Headers",
    "Access-Control-Allow-Origin",
    "Set-Cookie",
    "Content-Disposition",
]

CORS_ORIGIN_WHITELIST = getenv("DJANGO_CORS_ORIGIN_WHITELIST", "").split(",")
CORS_ALLOWED_ORIGINS = getenv("DJANGO_CORS_ALLOWED_ORIGINS", "").split(",")
CORS_ALLOW_ALL_ORIGINS = False
CORS_ALLOW_CREDENTIALS = True
To protect our app from Cross-Site-Request-Forgery we need to configure some settings:
CSRF_TRUSTED_ORIGINS = getenv("DJANGO_CSRF_TRUSTED_ORIGINS", "").split(",")
CSRF_COOKIE_SECURE = True
CSRF_COOKIE_HTTPONLY = False
CSRF_COOKIE_DOMAIN = getenv("DJANGO_CSRF_COOKIE_DOMAIN")
Other security settings:
ALLOWED_HOSTS = getenv("DJANGO_ALLOWED_HOSTS", "").split(",")
SESSION_COOKIE_SECURE = True
SESSION_COOKIE_DOMAIN = getenv("DJANGO_SESSION_COOKIE_DOMAIN")

SECURE_BROWSER_XSS_FILTER = True

SECURE_SSL_REDIRECT = True

SECURE_PROXY_SSL_HEADER = ("HTTP_X_FORWARDED_PROTO", "https")

SECURE_HSTS_SECONDS = 31536000
SECURE_HSTS_PRELOAD = True
SECURE_HSTS_INCLUDE_SUBDOMAINS = True
Serving static files
When django is set in a production environment it stops serving static files. Follow the documentation to integrate the functionality.
Install the dependency:
pip install whitenoiseAdd the configuration to your base.py:
MIDDLEWARE = [
    # ...
    "django.middleware.security.SecurityMiddleware",
    "whitenoise.middleware.WhiteNoiseMiddleware",
    # ...
]
STATIC_URL = "static/"
STATIC_ROOT = path.join(BASE_DIR, "static")
STATICFILES_STORAGE = "whitenoise.storage.CompressedManifestStaticFilesStorage"Include the serving of static files while in development:
if settings.DEBUG:
    urlpatterns += static(settings.STATIC_URL, document_root=settings.STATIC_ROOT)
Done!
Django has an implementation for sending directly emails via SMTP. A quick and easy way to send emails without additional costs is Resend. Go through the setup process, verify your domain and add some configuration to your settings in django:
EMAIL_BACKEND = "django.core.mail.backends.smtp.EmailBackend"

EMAIL_HOST = "smtp.resend.com"

EMAIL_PORT = 587

EMAIL_HOST_USER = "resend"

EMAIL_USE_TLS = True

EMAIL_HOST_PASSWORD = getenv("RESEND_API_KEY")

DEFAULT_FROM_EMAIL = "Webmaster <webmaster@yyy.com>"
While in development you can change the e-mail backend to print emails to the console:
EMAIL_BACKEND = "django.core.mail.backends.console.EmailBackend"Authentication
Key component of the website is the ability to update information. Since not everybody should be able to change, create or delete data we need some sort of authentication.
MFA is a mandatory functionality these days, so after a bit of research I found django-allauth, which also supports WebAuthn Passkeys.
The setup in the backend is surprisingly painless:
- Install the dependency
pip install django-allauth- django Settings
INSTALLED_APPS = [
    "django.contrib.admin",
    "django.contrib.auth",
    "django.contrib.contenttypes",
    "django.contrib.sessions",
    "django.contrib.messages",
    "django.contrib.staticfiles",
    "api.apps.ApiConfig",
    "simple_history",
    "rest_framework",
    "corsheaders",
    "allauth",
    "allauth.account",
    "allauth.mfa",
    "allauth.headless",
    "allauth.usersessions",
    "phonenumber_field",
]

MIDDLEWARE = [
    "corsheaders.middleware.CorsMiddleware",
    "django.middleware.security.SecurityMiddleware",
    "whitenoise.middleware.WhiteNoiseMiddleware",
    "django.contrib.sessions.middleware.SessionMiddleware",
    "django.middleware.common.CommonMiddleware",
    "django.middleware.csrf.CsrfViewMiddleware",
    "django.contrib.auth.middleware.AuthenticationMiddleware",
    "django.contrib.messages.middleware.MessageMiddleware",
    "django.middleware.clickjacking.XFrameOptionsMiddleware",
    "allauth.account.middleware.AccountMiddleware",
    "simple_history.middleware.HistoryRequestMiddleware",
]

TEMPLATES = [
    {
        "BACKEND": "django.template.backends.django.DjangoTemplates",
        "DIRS": [],
        "APP_DIRS": True,
        "OPTIONS": {
            "context_processors": [
                "django.template.context_processors.debug",
                "django.template.context_processors.request",
                "django.contrib.auth.context_processors.auth",
                "django.contrib.messages.context_processors.messages",
            ],
        },
    },
]- django-allauth Settings
AUTHENTICATION_BACKENDS = ("allauth.account.auth_backends.AuthenticationBackend",)

ACCOUNT_EMAIL_VERIFICATION = "mandatory"
ACCOUNT_UNIQUE_EMAIL = True
ACCOUNT_EMAIL_REQUIRED = True
ACCOUNT_USERNAME_REQUIRED = False
ACCOUNT_AUTHENTICATION_METHOD = "email"
ACCOUNT_LOGOUT_ON_PASSWORD_CHANGE = True
ACCOUNT_LOGIN_BY_CODE_ENABLED = True
ACCOUNT_EMAIL_VERIFICATION_BY_CODE_ENABLED = True

HEADLESS_ONLY = True

HEADLESS_FRONTEND_URLS = {
    "account_confirm_email": "/account/verify-email/{key}",
    "account_reset_password": "/account/password/reset",
    "account_reset_password_from_key": "/account/password/reset/key/{key}",
    "account_signup": "/account/signup",
    "socialaccount_login_error": "/account/provider/callback",
}

HEADLESS_SERVE_SPECIFICATION = True

MFA_SUPPORTED_TYPES = ["totp", "recovery_codes", "webauthn"]
MFA_PASSKEY_LOGIN_ENABLED = True
MFA_PASSKEY_SIGNUP_ENABLED = True
MFA_WEBAUTHN_ALLOW_INSECURE_ORIGIN = False- urls.py
from django.contrib import admin
from django.urls import path
from django.urls.conf import include
from django.conf import settings
from django.conf.urls.static import static
from dotenv import load_dotenv
from os import getenv

load_dotenv()

urlpatterns = [
    path(getenv("DJANGO_SECRET_ADMIN_URL") + "/admin/", admin.site.urls),
    path("api/", include("api.urls")),
    path("accounts/", include("allauth.urls")),
    path("_allauth/", include("allauth.headless.urls")),
]
You may have noticed the altered admin url. This can add an additional layer of security (by obscurity). Of course it doesn’t alleviate security concerns, but it prevents that automated bots can find the admin url by simply visiting /admin.
Disable Signups
You can skip this part if you want your users to be able to sign-up to your app. In my case only specific persons should have access. This can be achieved easily by adding an adapter:
- django Settings
ACCOUNT_ADAPTER = "api.adapter.CustomAccountAdapter"

ACCOUNT_ALLOW_SIGNUPS = Falseadapter.py(location must match with the preveusly defined in the settings):
from django.conf import settings
from allauth.account.adapter import DefaultAccountAdapter


class CustomAccountAdapter(DefaultAccountAdapter):

    def is_open_for_signup(self, request):
        """
        Whether to allow sign ups.
        """
        allow_signups = super(CustomAccountAdapter, self).is_open_for_signup(request)
        # Override with setting, otherwise default to super.
        return getattr(settings, "ACCOUNT_ALLOW_SIGNUPS", allow_signups)
Gunicorn
We will use the Web Server Gateway Interface for serving the backend in combination with gunicorn. The setup is very easy:
- Install the package
pip install gunicornNow when we want to run our application, we don’t call python manage.py runserverbut
python -m gunicorn --bind 0.0.0.0:8000 --workers 3 app.wsgi:applicationpointing to the wsgi.pyfile.
Docker File
Finally we can conclude the backend configuration. This multistage Dockerfile helps to reduce the image size and build time, by caching the installed dependencies and by limiting the permissions to the code being executed.
After installing all our dependencies, we need to save the requirements in a file called requirements.txtwhich can be obtained by running inside your virtual environment:
pip freeze > requirements.txtOtherwise we would have to copy the venv to the docker container, which can cause complications switching between operating systems.
- Dockerfile.prod
# app/Dockerfile.prod
###########
# BUILDER #
###########

# pull official base image
FROM python:3.11-slim as builder

# set work directory
WORKDIR /app

# set environment variables
ENV PYTHONDONTWRITEBYTECODE 1
ENV PYTHONUNBUFFERED 1


# install system dependencies
RUN apt-get update && \
apt-get install -y --no-install-recommends gcc


# install python dependencies
COPY requirements.txt .
RUN pip wheel --no-cache-dir --no-deps --wheel-dir /usr/src/app/wheels -r requirements.txt

#########
# FINAL #
#########

# pull official base image
FROM python:3.11-slim

# create directory for the app user
RUN mkdir -p /home/app

# create the app user
RUN addgroup --system app && adduser --system --group app

# create the appropriate directories
ENV HOME=/home/app
ENV APP_HOME=/home/app/web

RUN mkdir $APP_HOME

WORKDIR $APP_HOME

# install dependencies
COPY --from=builder /usr/src/app/wheels /wheels
COPY --from=builder /app/requirements.txt .

RUN pip install --upgrade pip
RUN pip install --no-cache /wheels/*

# copy project

COPY . $APP_HOME

# chown all the files to the app user
RUN chown -R app:app $APP_HOME

# change to the app user
USER app

CMD ["./entrypoint.prod.sh"]
entrypoint.prod.sh
#!/usr/bin/env bash

python manage.py collectstatic --noinput

python manage.py migrate --noinput

python -m gunicorn --bind 0.0.0.0:8000 --workers 3 app.wsgi:application
.dockerignore
*.pyc
*.pyo
*.mo
*.db
*.css.map
*.egg-info
*.sql.gz
.cache
.project
.idea
.pydevproject
.idea/workspace.xml
.DS_Store
.git/
.sass-cache
.vagrant/
__pycache__
.venv
dist
docs
env
logs
src/{{ project_name }}/settings/local.py
src/node_modules
web/media
web/static/CACHE
stats
Dockerfile
Dockerfile.prod
.env.local
Done!
Vite+React Frontend
We are 1/3 through the setup process. Now let’s look at the frontend. I can’t hide that I fell for the Shadcn/ui hype since I used it in all of my recent projects. The component library gives you much more control over the Components allowing you to customize them to your specific need. It also reduces the number of dependencies!
Follow the initial setup as described in their documentation: Install and configure shadcn/ui for Vite..
Shout out to leoMirandaa for his free shadcn landingpage template S hadcn/UI Landing Page Template!
For integrating authentication with the allauth backend, I followed their code example on GitHub React Single-Page Application.
.
├── Dockerfile
├── README.md
├── components.json
├── eslint.config.js
├── index.html
├── nginx.conf
├── package-lock.json
├── package.json
├── pnpm-lock.yaml
├── postcss.config.cjs
├── 🗂️ public
├── 🗂️ src
│   ├── App.css
│   ├── App.tsx
│   ├── 🗂️ account
│   ├── 🗂️ app
│   ├── 🗂️ assets
│   ├── 🗂️ components
│   ├── 🗂️ data
│   ├── 🗂️ hooks
│   ├── 🗂️ i18n
│   ├── index.css
│   ├── 🗂️ landingpage
│   ├── lib
│   ├── main.tsx
│   ├── 🗂️ mfa
│   ├── 🗂️ pages
│   ├── router.tsx
│   ├── 🗂️ usersessions
│   └── vite-env.d.ts
├── tailwind.config.js
├── tree.txt
├── tsconfig.app.json
├── tsconfig.json
├── tsconfig.node.json
└── vite.config.ts
Env Variables and Vite
One of the most frustrating parts of this project, was to solve env variables in vite. At the end the solution doesn’t change the outcome, since I only used client-side rendering. Vite replaces all references with the variables value in the client-side environment. But for security and code quality reasons I didn’t want to save the raw values in the codebase.
While development vite loads the .env files just fine without problems. Look at their documentation to get a better understanding. In short words variables that get used by the client, need to be prefixed with VITE_ are accessed by calling
import.meta.env.VITE_SOME_KEY;Later you will see that I used here a multistage Dockerfile aswell. The last stage copies the content to a nginx container which serves the content. Env variables gets passed only to the running container, where vite isn’t active anymore. Hence the variables aren’t present at the time of building the react code and the references remain undefined.
Luckily Docker has build arguments hat alleviate this problem. It produces some inconvenient code, but it works. Therefore later in the docker compose file the variables don’t get passed as env variables but as build arguments.
ARG VITE_SOME_KEY

ENV VITE_SOME_KEY=$VITE_SOME_KEY
Credits to this Stackoverflow discussion Docker with Vite - env variables are undefined inside the docker container
Fetch Data
When posting data be sure to add the csrf token to the requests, so it doesn’t get rejected by the server. Another important part is to include the authentication tokens / sessions to the request.
This is what a GET request can look like. The important part is withCredentials: true. Same functionality can be achieved with axios.defaults.withCredentials = true;
const url = `${import.meta.env.VITE_BACKEND_URL}/api/contact-form-submissions?page=${pageParam}`;

const headers = {
  'Content-Type': 'application/json',
};

const response = await axios.get<ApiResponse>(url, {
  headers,
  withCredentials: true,
});

return response.data;
Here a sample POST request:
const url = `${import.meta.env.VITE_BACKEND_URL}/api/service/${serviceId}/${mutation}`;

const csrf = getCSRFToken();

const headers = {
  'Content-Type': 'application/json',
  'X-CSRFToken': csrf,
};

axios.defaults.withCredentials = true;

const response = await axios.post<Service>(url, {}, { headers: headers });

return response.data;
Configurations
vite.config.ts
import path from 'path';
import react from '@vitejs/plugin-react';
import { defineConfig } from 'vite';

import { compression } from 'vite-plugin-compression2';

// https://vite.dev/config/

export default defineConfig({
  plugins: [react(), compression()],
  resolve: {
    alias: {
      '@': path.resolve(__dirname, './src'),
    },
  },
  server: {
    port: 5173,
    allowedHosts: ['domain.com'],
  },
  preview: {
    port: 5173,
    allowedHosts: true,
  },
});
Dockerfile
FROM node:20.14.0 AS build

WORKDIR /app

ARG VITE_BACKEND_URL
ARG VITE_JAWG_ACCESS_TOKEN
ARG VITE_POSTHOG_HOST
ARG VITE_POSTHOG_API_KEY
ARG VITE_TURNSTILE_SITE_KEY

ENV VITE_BACKEND_URL=$VITE_BACKEND_URL
ENV VITE_JAWG_ACCESS_TOKEN=$VITE_JAWG_ACCESS_TOKEN
ENV VITE_POSTHOG_HOST=$VITE_POSTHOG_HOST
ENV VITE_POSTHOG_API_KEY=$VITE_POSTHOG_API_KEY
ENV VITE_TURNSTILE_SITE_KEY=$VITE_TURNSTILE_SITE_KEY

COPY package.json ./

RUN npm install
ENV PATH /app/node_modules/.bin:$PATH

COPY . .

RUN npm run build


FROM nginx:1.27.4-alpine

COPY ./nginx.conf /etc/nginx/conf.d/default.conf
COPY --from=build /app/dist /var/www/html/

ENTRYPOINT ["nginx","-g","daemon off;"]
.dockerignore
node_modules
.env
!.env.production
Dockerfile
nginx.conf
server {

    listen 3000;
    server_name localhost;

    location / {
        root /var/www/html;
        index index.html index.htm;
        try_files $uri $uri/ /index.html =404;
    }

    gzip on;
    gzip_disable "msie6";
    gzip_vary on;
    gzip_proxied any;
    gzip_comp_level 6;
    gzip_buffers 16 8k;
    gzip_http_version 1.1;
    gzip_types text/plain text/css application/json application/x-javascript text/xml application/xml application/xml+rss text/javascript;
}
Traefik Reverse Proxy
Last but not least we want traffic to be routed to the desired destinations. We also don’t want to handle certificates for each of the services, hence we use a reverse proxy. It interfaces internally via http with the applications and forwards it to the user using https.
Here we also rely on env variables for the configuration. These get defined in an .env file inside the project structure.
docker-compose.yml
services:
  traefik:
  build:
    context: traefik/
    dockerfile: Dockerfile
  deploy:
    restart_policy:
      condition: always
  ports:
    - 80:80
    - 443:443
  volumes:
    - '/var/run/docker.sock:/var/run/docker.sock:ro'
    - './traefik-public-certificates:/certificates'
  labels:
    - 'traefik.enable=true'
    - 'traefik.http.routers.dashboard.rule=Host(`${TREAFIK_DASHBOARD_HOST}`)'
    - 'traefik.http.routers.dashboard.tls=true'
    - 'traefik.http.routers.dashboard.tls.certresolver=letsencrypt'
    - 'traefik.http.routers.dashboard.service=api@internal'
    - 'traefik.http.routers.dashboard.middlewares=auth,traefik-compress'
    - 'traefik.http.middlewares.auth.basicauth.users=${TREAFIK_USER}:${TREAFIK_PASSWORD}'
    - 'traefik.http.routers.traefik.middlewares=traefik-compress'
    - 'traefik.http.middlewares.traefik-compress.compress=true'
You can leave out the labels enabling the dashboard interface. The interesting part is the compression feature. This helps on improving load times and seo performance.
- Dockerfile
FROM traefik:v3.3

COPY ./traefik.prod.toml ./etc/traefik/traefik.toml
traefik.prod.toml
[entryPoints]
[entryPoints.web]
address = ":80"
[entryPoints.web.http]
[entryPoints.web.http.redirections]
[entryPoints.web.http.redirections.entryPoint]
to = "websecure"
scheme = "https"
[entryPoints.websecure]
address = ":443"

[accessLog]

[api]
dashboard = true

[providers]
[providers.docker]
exposedByDefault = false

[certificatesResolvers.letsencrypt.acme]
email = "your.email@email.com"
storage = "/certificates/acme.json"
[certificatesResolvers.letsencrypt.acme.httpChallenge]
entryPoint = "web"
Postgres Database
db:
  image: 'postgres:latest'
  hostname: db
  deploy:
    restart_policy:
      condition: always
  environment:
    POSTGRES_DB: ${POSTGRES_DB}
    POSTGRES_USER: ${POSTGRES_USER}
    POSTGRES_PASSWORD: ${POSTGRES_PASSWORD}
  ports:
    - '5432:5432'
  volumes:
    - postgres_data:/var/lib/postgresql/data/
Backend
Here we also enable compression and define the specific urls that are also present in the urls.py in our django project. Notice that the “secret” admin url is also being set with an env variable.
![[Bildschirmfoto 2025-03-11 um 12.20.01.png]]
backend:
  build:
    context: backend/
    dockerfile: Dockerfile.prod
  labels:
    - 'traefik.enable=true'
    - 'traefik.http.routers.donne-backend.entrypoints=websecure'
    - 'traefik.http.routers.donne-backend.rule=Host(`${TREAFIK_HOST}`) && ( PathPrefix(`/api`) || PathPrefix(`/static`) || PathPrefix(`/${DJANGO_SECRET_ADMIN_URL}/admin`) || PathPrefix(`/_allauth`) || PathPrefix(`/accounts`) )'
    - 'traefik.http.routers.donne-backend.tls=true'
    - 'traefik.http.routers.donne-backend.tls.certresolver=letsencrypt'
    - 'traefik.http.services.donne-backend.loadbalancer.server.port=8000'
    - 'traefik.http.routers.donne-backend.service=donne-backend'
    - 'traefik.http.routers.donne-backend.middlewares=donne-backend-compress'
    - 'traefik.http.middlewares.donne-backend-compress.compress=true'
  env_file:
    - .env.prod
  deploy:
    restart_policy:
      condition: always
  depends_on:
    - db
Frontend
Like for the backend, compression is enabled. We find also the before mentioned build arguments. For SEO purposes there is also a configuration for redirecting www to non-www endpoints.
![[Bildschirmfoto 2025-03-11 um 12.21.17.png]]
frontend:
  build:
    context: frontend
    dockerfile: Dockerfile
  args:
    VITE_BACKEND_URL: ${VITE_BACKEND_URL}
    VITE_JAWG_ACCESS_TOKEN: ${VITE_JAWG_ACCESS_TOKEN}
    VITE_POSTHOG_API_KEY: ${VITE_POSTHOG_API_KEY}
    VITE_POSTHOG_HOST: ${VITE_POSTHOG_HOST}
    VITE_TURNSTILE_SITE_KEY: ${VITE_TURNSTILE_SITE_KEY}
  labels:
    - 'traefik.enable=true'
    - 'traefik.http.routers.donne-frontend.entrypoints=websecure'
    - 'traefik.http.routers.donne-frontend.rule=Host(`${TREAFIK_HOST}`) || Host(`www.${TREAFIK_HOST}`)'
    - 'traefik.http.routers.donne-frontend.tls=true'
    - 'traefik.http.routers.donne-frontend.tls.certresolver=letsencrypt'
    - 'traefik.http.routers.donne-frontend.service=donne-frontend'
    - 'traefik.http.routers.donne-frontend.middlewares=donne-frontend-compress'
    - 'traefik.http.routers.donne-frontend.middlewares=redirect-to-non-www'
    - 'traefik.http.services.donne-frontend.loadbalancer.server.port=3000'
    - 'traefik.http.middlewares.donne-frontend-compress.compress=true'
    - 'traefik.http.middlewares.redirect-to-non-www.redirectregex.regex=^https?://www.${TREAFIK_HOST}/(.*)'
    - 'traefik.http.middlewares.redirect-to-non-www.redirectregex.replacement=https://${TREAFIK_HOST}/$${1}'
    - 'traefik.http.middlewares.redirect-to-non-www.redirectregex.permanent=true'
  deploy:
    restart_policy:
      condition: always
Volumes
The certificates and database files should be saved inside of volumes, so that they are accessible even after the container gets deleted or recreated.
volumes:
  postgres_data:
  traefik-public-certificates:
Ci/Cd
Git is essential to keep a clean understanding of the changes made to the codebase even if you are working on your own (especially). It gives you also a way to automatically run tests, codequality /vulnerability scanners and deployment pipelines.
I use a self-hosted version of GitLab with a GitLab Runner in my Homelab.
Rest coming soon.
Conclusion
Building and launching a website from start to finish was an important experience. In past projects I used part of the different concepts but never put all the components together. It is certainly over-engineered for such a simple project, knowing that the data could simply be saved as a textfile.

Sources
- How To Harden the Security of Your Production Django Project
- FASTEST Way to Host Your Website with Linux and Docker!
- Docker + Django: Containerize the Right Way with Nginx, Postgresql & Gunicorn
- Docker Image BEST Practices - From 1.2GB to 10MB
- Dockerizing Django with Postgres, Gunicorn, and Nginx
- Docker with Vite - env variables are undefined inside the docker container